1. 条件等待
1.1 达成等待条件
C++标准库对条件变量有两套实现:std::condition_variable和std::condition_variable_any。两者都需要与一个互斥量一起才能工作(互斥量是为了同步);前者仅限于与std::mutex一起工作,而后者可以和任何满足最低标准的互斥量一起工作。一般默认使用前者。
下面展示了等待唤醒机制的使用:
std::mutex mut;
std::queue<data_chunk> data_queue;  // 1
std::condition_variable data_cond;

void data_preparation_thread()
{
  while(more_data_to_prepare())
  {
    data_chunk const data=prepare_data();
    std::lock_guard<std::mutex> lk(mut);
    data_queue.push(data);  // 2
    data_cond.notify_one();  // 3
  }
}

void data_processing_thread()
{
  while(true)
  {
    std::unique_lock<std::mutex> lk(mut);  // 4
    data_cond.wait(
         lk,[]{return !data_queue.empty();});  // 5
    data_chunk data=data_queue.front();
    data_queue.pop();
    lk.unlock();  // 6
    process(data);
    if(is_last_chunk(data))
      break;
  }
}
上面的代码使用一个队列在两个线程间传递数据。
在void data_processing_thread()中,我们要从队列中读取数据,首先4锁住互斥量;5在wait()函数中传递锁和lambda表达式,当判断结果为空时,线程休眠。
在void data_preparation_thread()中,2准备好数据后,先锁住互斥量,然后压入队列中;3通过notify_one()函数唤醒,结束后自动析构。
回到void data_processing_thread()中,由于唤醒消息的到来,这个函数重新启动,从头开始上锁、检查。
1.2 实战示例:使用等待条件构建线程安全队列
我们模仿第二篇讲到的线程安全栈,构建一个线程安全的队列。所谓线程安全就是要像栈那样将top和pop合并。这里提供pop()函数的两个变种:try_pop()和wait_and_pop()。try_pop() ,尝试从队列中弹出数据,即使为空也会直接返回;wait_and_pop(),将会等待有值可检索的时候才返回。接口就可能会是下面这样:
template<typename T>
class threadsafe_queue
{
public:
  threadsafe_queue();
  threadsafe_queue(const threadsafe_queue&);
  threadsafe_queue& operator=(
      const threadsafe_queue&) = delete;  // 不允许简单的赋值

  void push(T new_value);

  bool try_pop(T& value);  // 1
  std::shared_ptr<T> try_pop();  // 2

  void wait_and_pop(T& value);
  std::shared_ptr<T> wait_and_pop();

  bool empty() const;
};
和之前一样,也需要提供两个版本的try_pop()和wait_for_pop()。第一个重载的try_pop()①在引用变量中存储着检索值,所以它可以用来返回队列中值的状态;当检索到一个变量时,他将返回true,否则将返回false。第二个重载②就不能做这样了,因为它是用来直接返回检索值的。当没有值可检索时,这个函数可以返回NULL指针。
完整版如下:
template<typename T>
class threadsafe_queue
{
private:
  mutable std::mutex mut;  // 1 互斥量必须是可变的
  std::queue<T> data_queue;
  std::condition_variable data_cond;
public:
  threadsafe_queue()
  {}
  threadsafe_queue(threadsafe_queue const& other)
  {
    std::lock_guard<std::mutex> lk(other.mut);
    data_queue=other.data_queue;
  }

  void push(T new_value)
  {
    std::lock_guard<std::mutex> lk(mut);
    data_queue.push(new_value);
    data_cond.notify_one();
  }

  void wait_and_pop(T& value)
  {
    std::unique_lock<std::mutex> lk(mut);
    data_cond.wait(lk,[this]{return !data_queue.empty();});
    value=data_queue.front();
    data_queue.pop();
  }

  std::shared_ptr<T> wait_and_pop()
  {
    std::unique_lock<std::mutex> lk(mut);
    data_cond.wait(lk,[this]{return !data_queue.empty();});
    std::shared_ptr<T> res(std::make_shared<T>(data_queue.front()));
    data_queue.pop();
    return res;
  }

  bool try_pop(T& value)
  {
    std::lock_guard<std::mutex> lk(mut);
    if(data_queue.empty())
      return false;
    value=data_queue.front();
    data_queue.pop();
    return true;
  }

  std::shared_ptr<T> try_pop()
  {
    std::lock_guard<std::mutex> lk(mut);
    if(data_queue.empty())
      return std::shared_ptr<T>();
    std::shared_ptr<T> res(std::make_shared<T>(data_queue.front()));
    data_queue.pop();
    return res;
  }

  bool empty() const
  {
    std::lock_guard<std::mutex> lk(mut);
    return data_queue.empty();
  }
};
当新的数据准备完成,调用notify_one()将会触发一个正在执行wait()的线程,去检查条件和wait()函数的返回状态。 这里不保证线程一定会被通知到,即使只有一个等待线程收到通知,所有处理线程也有可能仍然在处理数据,而忽略了这个通知。
在定期重新初始化(periodic reinitialization)情况下,线程准备数据数据时,就会通过条件变量调用notify_all()成员函数,而非直接调用notify_one()函数。顾名思义,这就是全部线程在都去执行wait()(检查他们等待的条件是否满足)的原因。
2. 期望等待
条件等待是指某个条件满足后,线程被激活,这是一个可重复利用的过程,流程是:条件不足—休眠—条件满足—激活—条件不足—休眠….
而期望模型(future)则是对某一一次性特定事件的等待。某种程度上来说就需要知道这个事件在未来的期望结果,之后这个线程会在短周期内等待或检查,期间也会执行其他任务。
C++标准库中,有两种期望值,使用两种类型模板实现,声明在std::future<>)和共享期望值(shared futures)(std::shared_future<>)。仿照了std::unique_ptr和std::shared_ptr。std::future的实例只能与一个指定事件相关联,而std::shared_future的实例就能关联多个事件
2.1 std::async
有的时候我们需要一个长时间计算的结果,但却并不急着需要它,所以我们使用std::async函数模板。当不着急要任务结果时,可以使用std::async启动一个异步任务。与std::thread对象等待的方式不同,std::async会返回一个std::future对象,这个对象持有最终计算出来的结果。当需要这个值时,只需要调用这个对象的get()成员函数,会阻塞线程直到期望值状态为就绪为止;之后,返回计算结果。
下面举一个简单的例子:
void main() {
    auto maxnum = 10000;
    vector<int> hello;
    auto fun = [maxnum  = maxnum , &hello]()
    {
        for (int i = 0; i < maxnum; i++)
            hello.push_back(i);
        return std::accumulate(hello.begin(), hello.end(), 0);
    };
    auto the_answer = std::async(fun);
    for (int i = 0; i < 100; i++)
    {
        cout << i <<" ";
        Sleep(1000);
        if(i==5)
            std::cout << the_answer.get()<<" " << endl;
    }
}
/*
output:
0 1 2 3 4 5 49995000 6 ...
*/
与std::thread 做的方式一样,std::async允许你通过添加额外的调用参数,向函数传递额外的参数。当第一个参数是一个指向成员函数的指针,第二个参数提供有这个函数成员类的具体对象(不是直接的,就是通过指针,还可以包装在std::ref中),剩余的参数可作为成员函数的参数传入。
在函数调用之前向std::async传递一个额外参数,这个参数的类型是std::launch,还可以是std::launch::defered,表明函数调用被延迟到wait()或get()函数调用时才执行,std::launch::async 表明函数必须在其所在的独立线程上执行,并且立即执行,std::launch::deferred | std::launch::async表明实现可以选择这两种方式的一种。
2.2 std::packaged_task<>
std::packaged_task<>包装任何可调用 (Callable) 目标,包括函数、 lambda 表达式、 bind 表达式或其他函数对象,使得能异步调用它,其返回值或所抛异常被存储于能通过 std::future 对象访问的共享状态中。简言之,将一个普通的可调用函数对象转换为异步执行的任务。
模板参数是一个函数签名,比如void()就是一个没有参数也没有返回值的函数,或int(std::string&, double*)就是有一个非const引用的std::string和一个指向double类型的指针,并且返回类型是int。
下面给出它的使用范例:
//1.包装lambda表达式
auto cmp = [](auto a, auto b) {return a < b; };
packaged_task<bool(int, int)> task(cmp);
//仿函数形式启动任务
task(2, 10);
//获取共享状态中的值,直到ready才能返回结果或者异常
auto res = task.get_future();
cout <<boolalpha<< res.get() << endl;


//2.包装普通函数
bool cmp(int a, int b)
{
    return a < b;
}
std::packaged_task<bool(int, int)> task(cmp);
task(6, 3);
auto res = task.get_future();
cout << boolalpha << res.get() << endl;

//3.通过线程启动
task.reset();
res = task.get_future();

//通过线程启动任务
thread td(move(task), 2, 10);
td.join();
//获取执行结果
cout << "task_thread :" << res.get() << "\n";
2.3 std::promise<>
顾名思义,就是承诺的意思。承诺和期望是好朋友,先申明一个承诺,再获得期望结果。std::packaged_task是他更高级的抽象。通过set_value将结果转化为指定值,从而实现他的承诺。
void accumulate(std::vector<int>::iterator first,
                std::vector<int>::iterator last,
                std::promise<int> accumulate_promise)
{
    int sum = std::accumulate(first, last, 0);
    accumulate_promise.set_value(sum);  // 提醒 future
}

// 演示用 promise<int> 在线程间传递结果。
std::vector<int> numbers = { 1, 2, 3, 4, 5, 6 };
std::promise<int> accumulate_promise;
std::future<int> accumulate_future = accumulate_promise.get_future();
std::thread work_thread(accumulate, numbers.begin(), numbers.end(),
                        std::move(accumulate_promise));
std::cout << "result=" << accumulate_future.get() << '\n';
work_thread.join();
2.4 std::shared_future
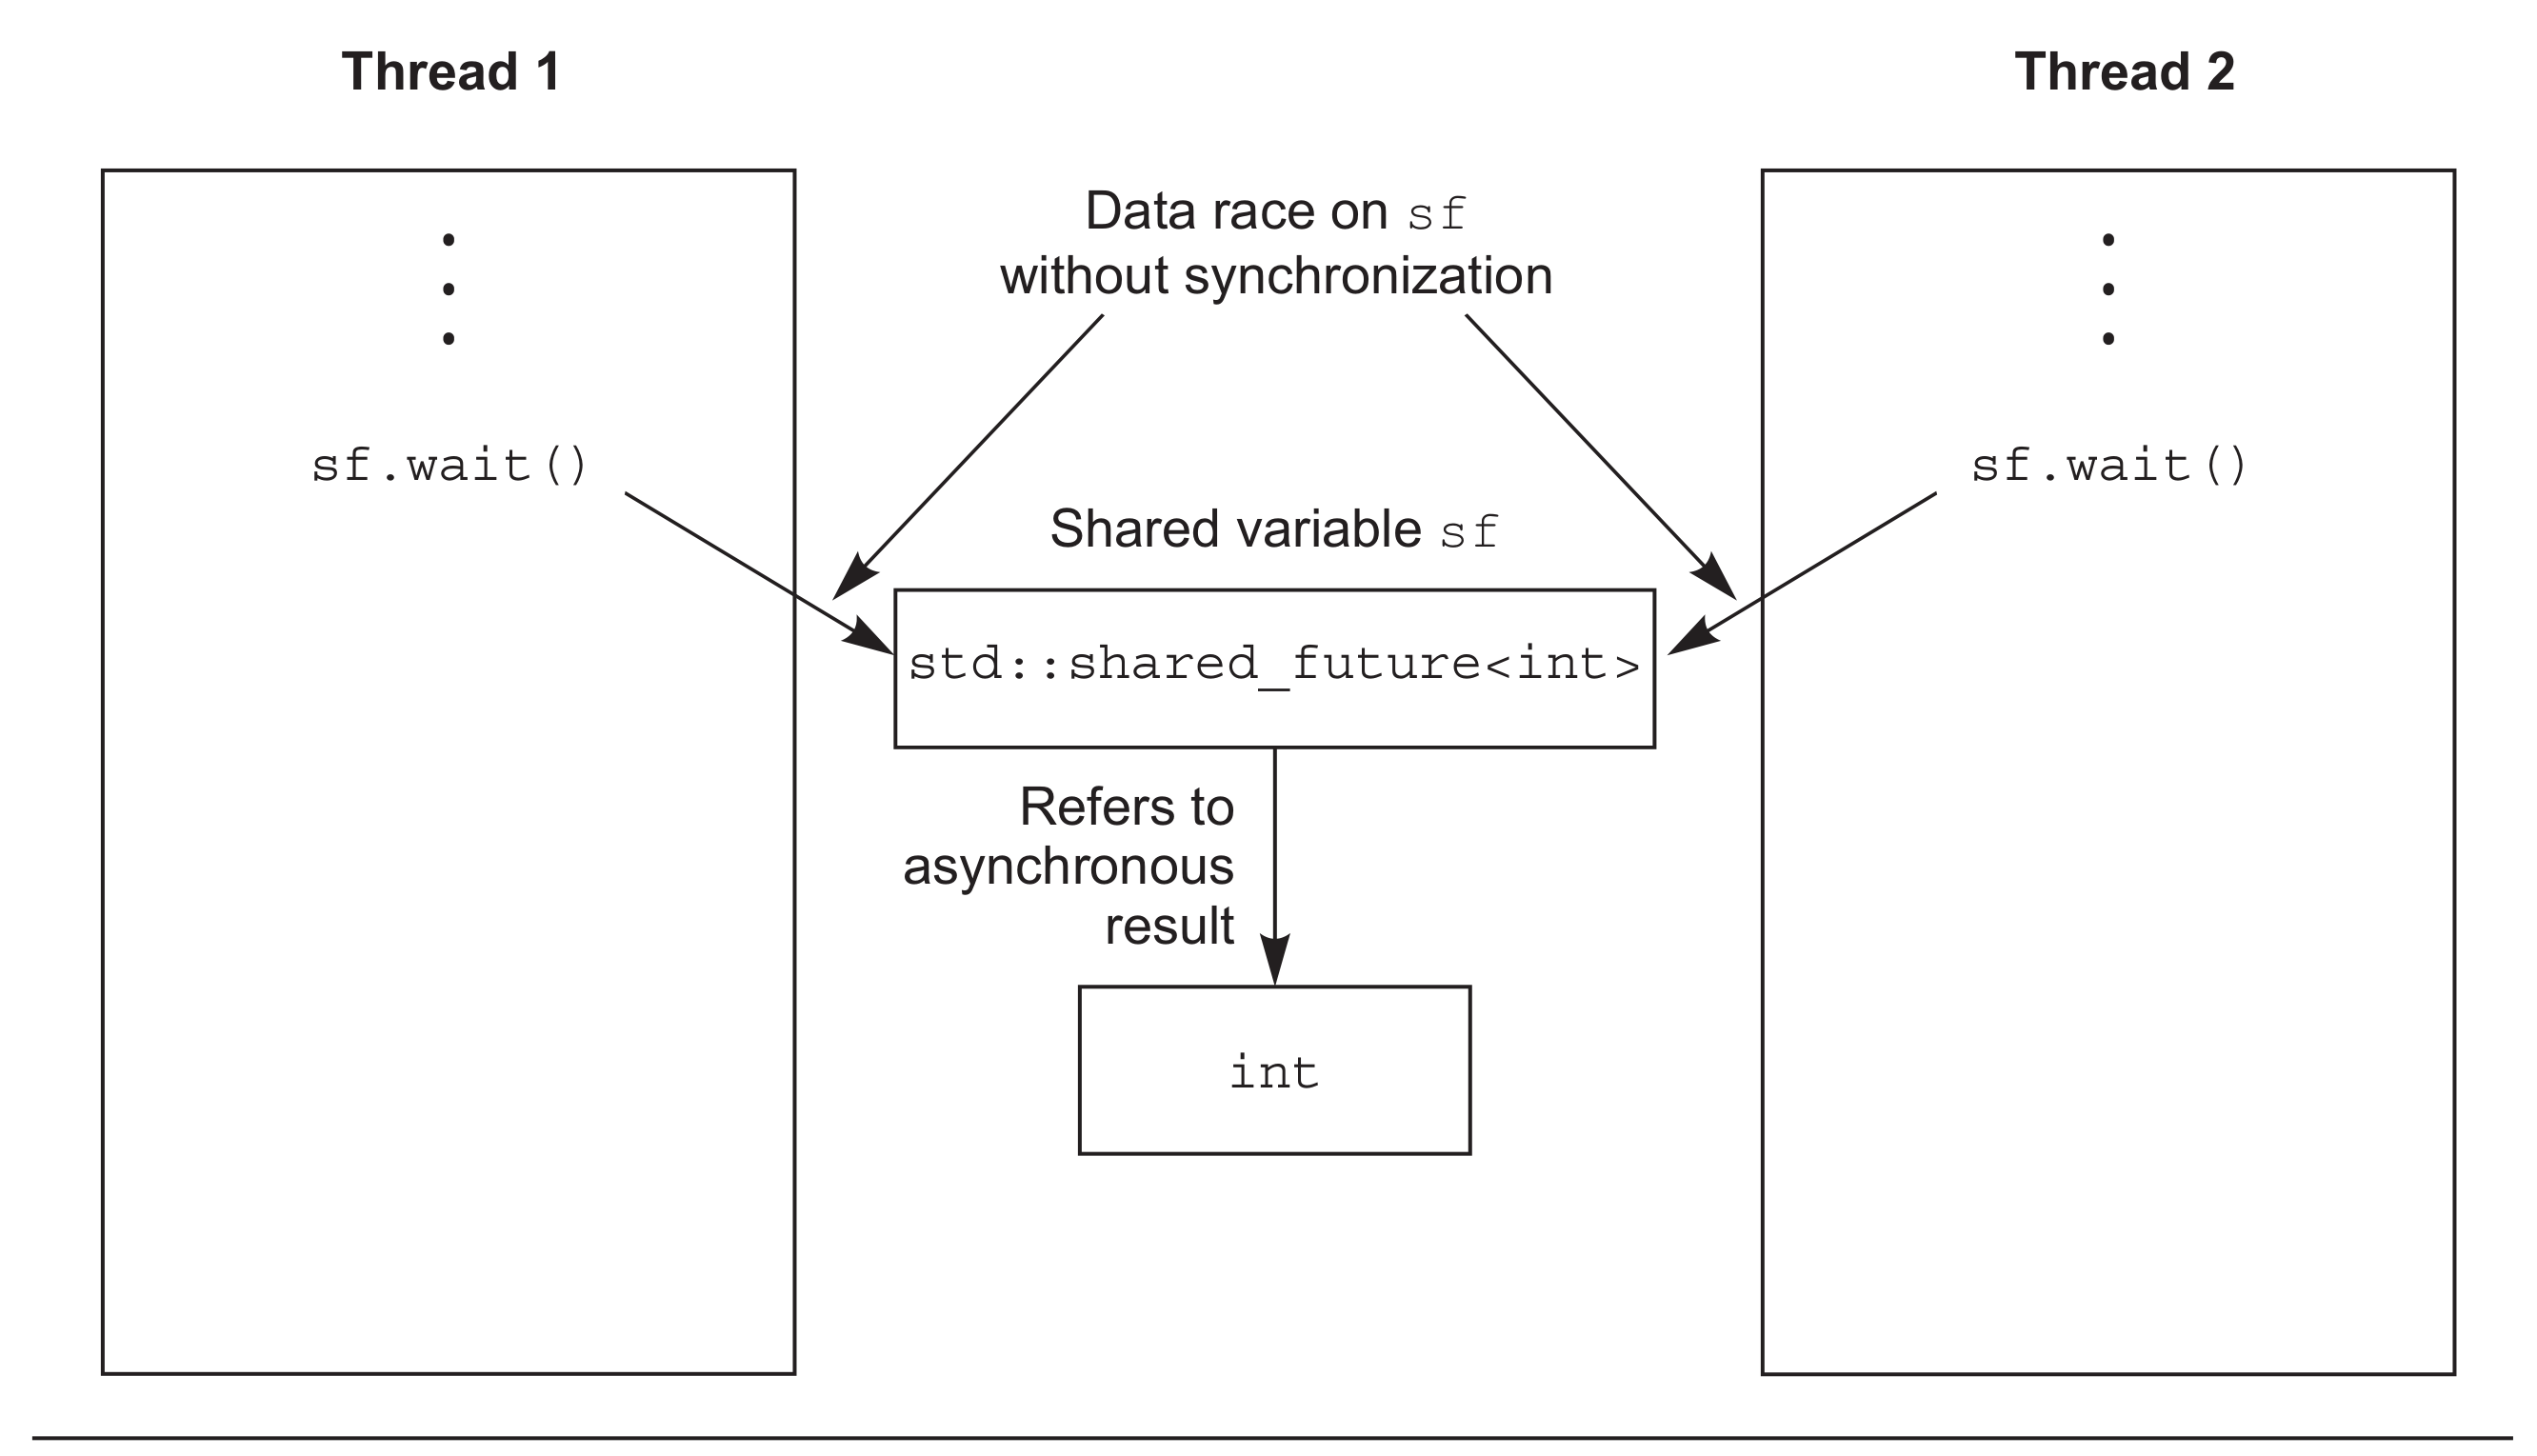
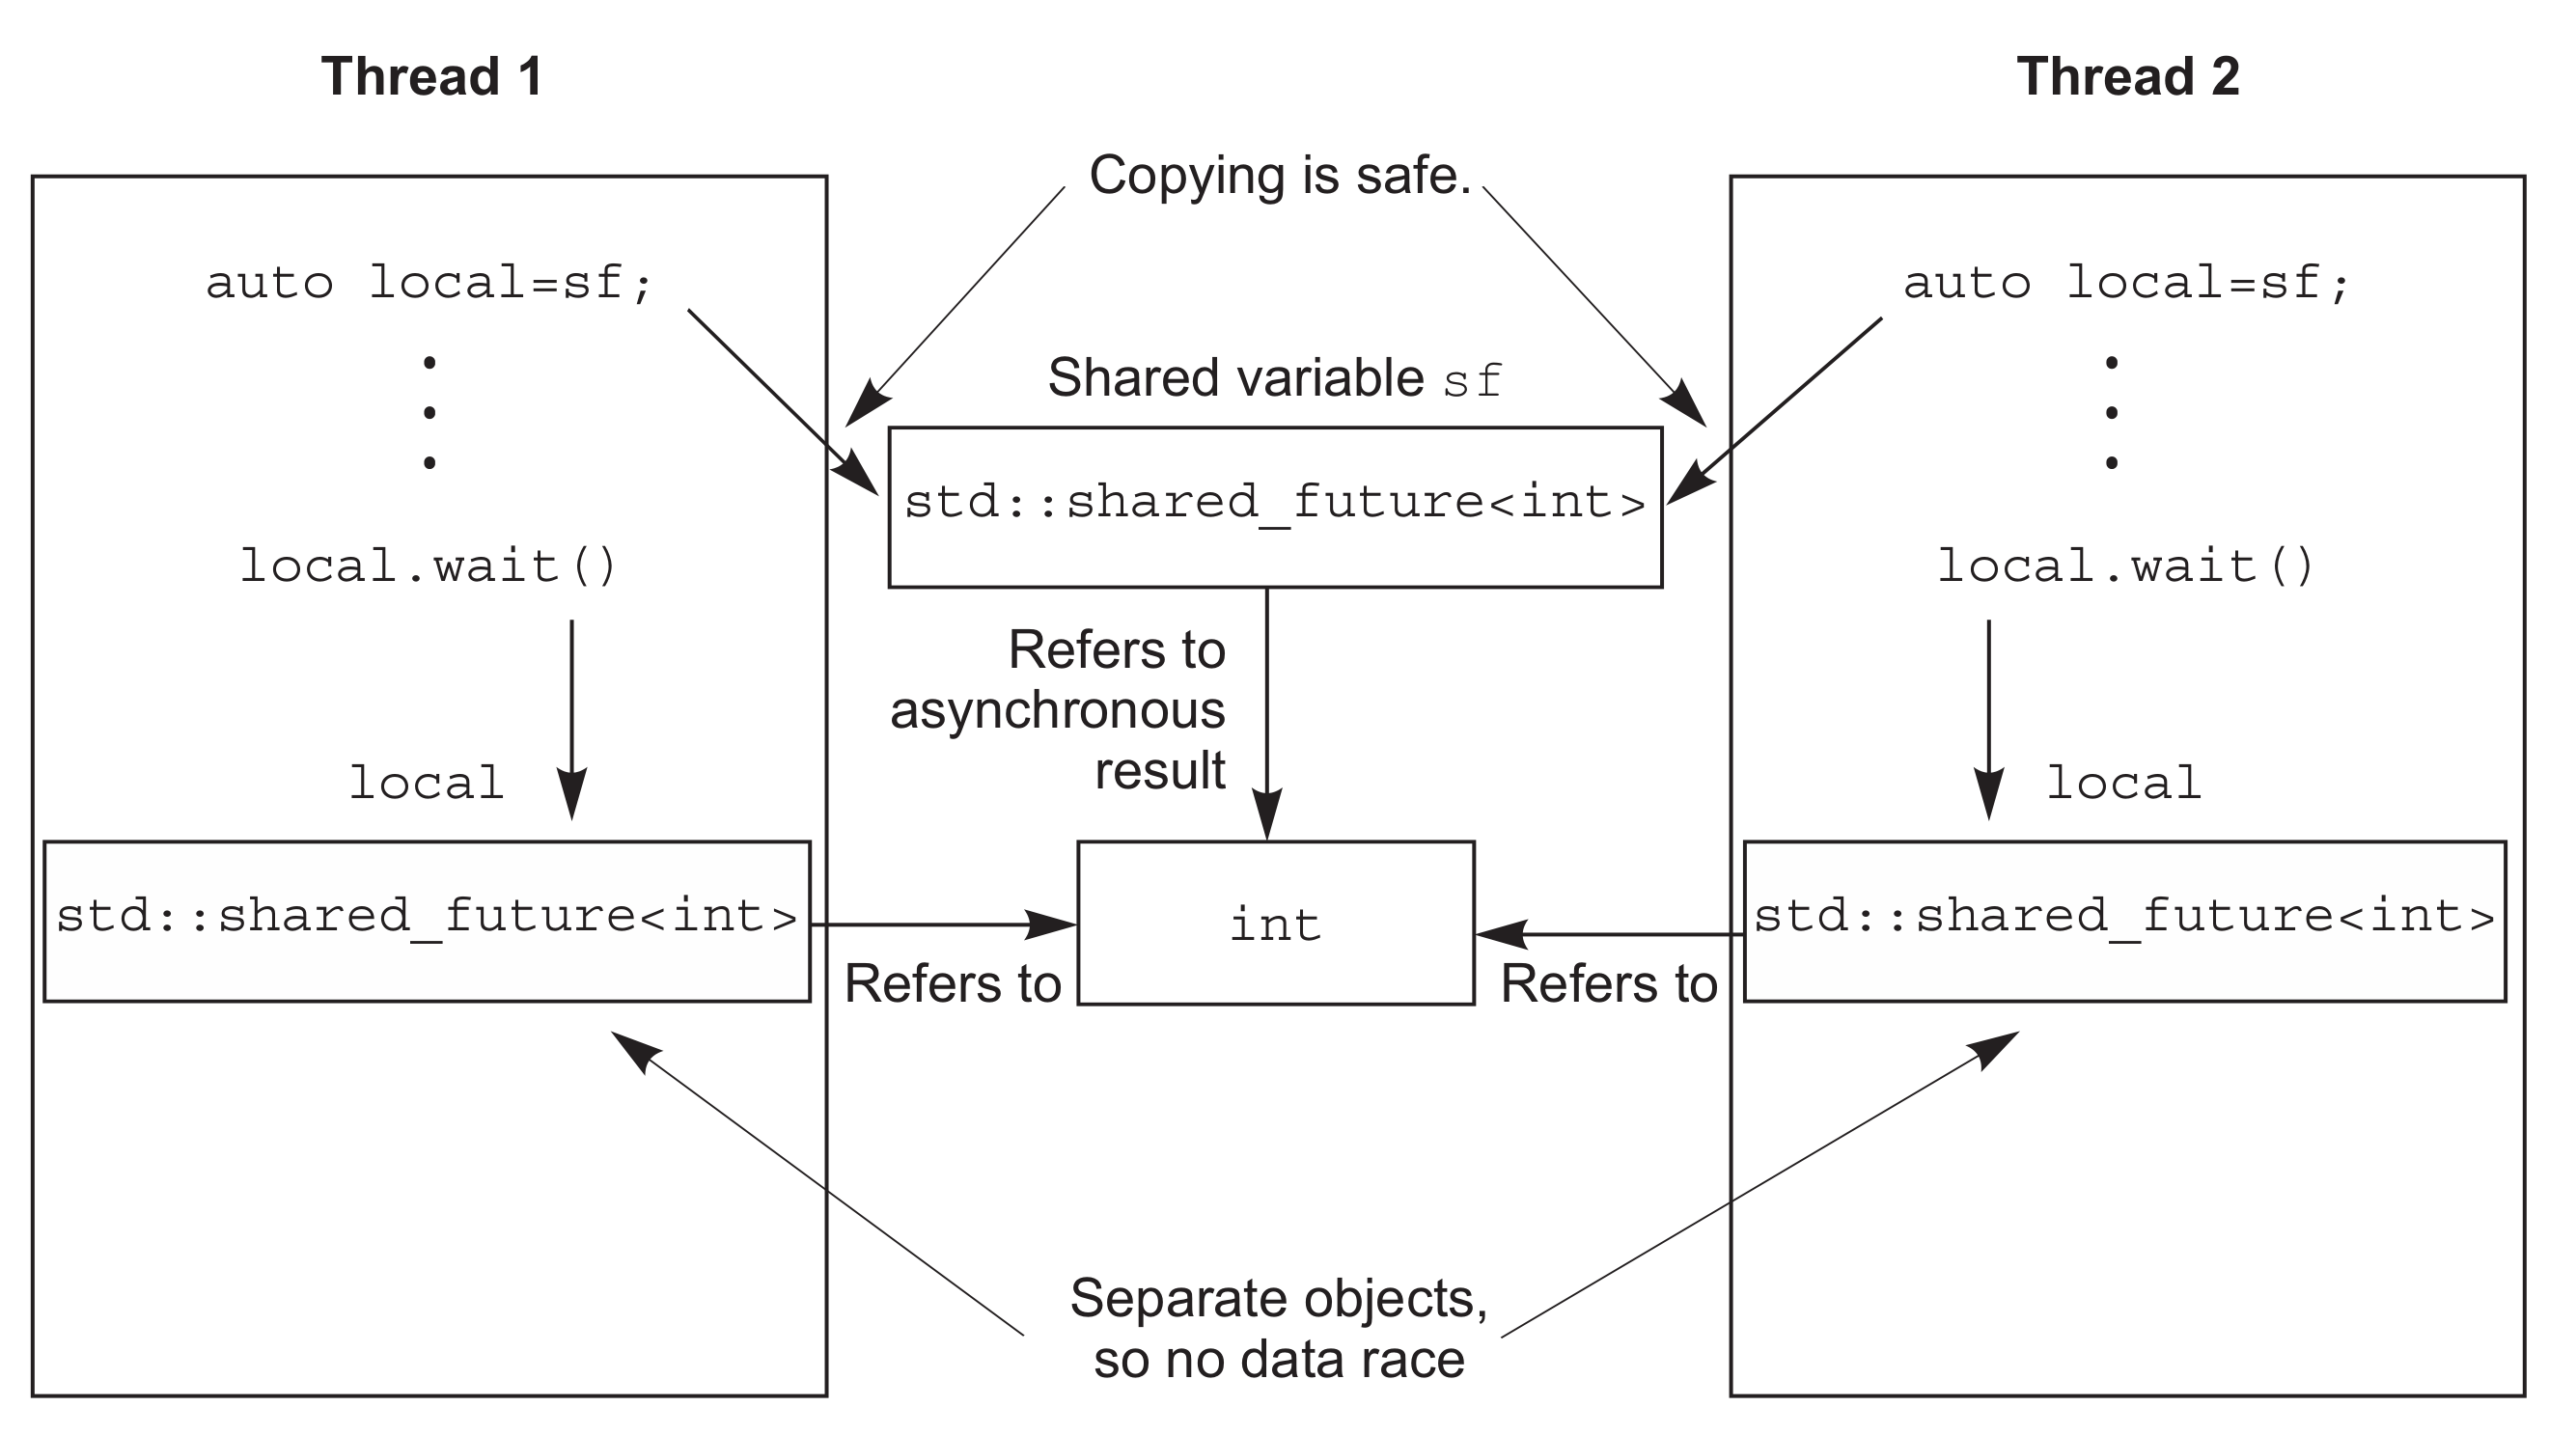
虽然std::future可以处理所有在线程间数据转移的同步,但他是一个独享变量,换句话说,当一个线程取得他以后,他就变成一个空壳,其他线程就无法共享这个数据。所以有了可以共享的期望std::shared_future。
std::future是只移动的,所以其所有权可以在不同的实例中互相传递,但是只有一个实例可以获得特定的同步结果,而std::shared_future实例是可拷贝的,所以多个对象可以引用同一关联期望值的结果。
每一个std::shared_future的独立对象上,成员函数调用返回的结果还是不同步的,所以为了在多个线程访问一个独立对象时避免数据竞争,必须使用锁来对访问进行保护。优先使用的办法:为了替代只有一个拷贝对象的情况,可以让每个线程都拥有自己对应的拷贝对象。这样,当每个线程都通过自己拥有的std::shared_future对象获取结果,那么多个线程访问共享同步结果就是安全的。
下面展示了他的使用过程:可以想象为两个选手的赛跑比赛,std::async作用是让两个选手上跑道准备就绪,选手准备好后就等待ready_future的信号。ready_promise.set_value();发令枪响,开始计时,两个选手开始。跑完后结果存在result1,result2中。
void main()
{
    std::promise<void> ready_promise;
    std::shared_future<void> ready_future(ready_promise.get_future());

    std::chrono::time_point<std::chrono::high_resolution_clock> start;

    auto fun1 = [&, ready_future]() -> std::chrono::duration<double, std::milli>
    {
        auto fun1_future = ready_future;
        fun1_future.wait(); // 等待来自 main() 的信号
        return std::chrono::high_resolution_clock::now() - start;
    };

    auto fun2 = [&, ready_future]() -> std::chrono::duration<double, std::milli>
    {
        auto fun2_future = ready_future;
        fun2_future.wait(); // 等待来自 main() 的信号
        return std::chrono::high_resolution_clock::now() - start;
    };

    auto result1 = std::async(std::launch::async, fun1);
    auto result2 = std::async(std::launch::async, fun2);

    // 向线程发信使之运行
    ready_promise.set_value();
    // 线程已就绪,开始时钟
    start = std::chrono::high_resolution_clock::now();

    std::cout << "Thread 1 received the signal "
        << result1.get().count() << " ms after start\n"
        << "Thread 2 received the signal "
        << result2.get().count() << " ms after start\n";
}
3. 等待时间
3.1 时钟
对于C++标准库来说,时钟就是时间信息源。并且,时钟是一个类,提供了四种不同的信息:
- 当前时间
- 时间类型
- 时钟节拍
- 通过时钟节拍的分布,判断时钟是否稳定
当前时间可以通过调用静态成员函数now()从时钟类中获取;例如,std::chrono::system_clock::now()是将返回系统时钟的当前时间。
时钟节拍被指定为1/x(x在不同硬件上有不同的值)秒,这是由时间周期所决定——一个时钟一秒有25个节拍,因此一个周期为std::ratio<1, 25>,当一个时钟的时钟节拍每2.5秒一次,周期就可以表示为std::ratio<5, 2>。
当时钟节拍均匀分布(无论是否与周期匹配),并且不可调整,这种时钟就称为稳定时钟。当is_steady静态数据成员为true时,表明这个时钟就是稳定的;否则,就是不稳定的。通常情况下,std::chrono::system_clock是不稳定的,因为时钟是可调的,即是这种是完全自动适应本地账户的调节。稳定闹钟对于超时的计算很重要,所以C++标准库提供一个稳定时钟std::chrono::steady_clock。
3.2 时延
std::chrono::duration<>函数模板能够创建一段时延,比如std::chrono::duration>时间为60秒,std::chrono::duration>时间为1毫秒。
标准库在std::chrono命名空间内,为延时变量提供一系列预定义类型:nanoseconds[纳秒] , microseconds[微秒] , milliseconds[毫秒] , seconds[秒] , minutes[分]和hours[时]。
std::chrono::milliseconds ms(54802);
方便起见,C++14中std::chrono_literals命名空间中,有许多预定义的后缀操作符用来表示时长。下面简单的代码就是使用硬编码的方式赋予具体的时长值:
using namespace std::chrono_literals;
auto one_day=24h;
auto half_an_hour=30min;
auto max_time_between_messages=30ms;
基于时延的等待可由std::chrono::duration<>来完成,例如:等待期望值状态变为就绪已经35毫秒:
std::future<int> f=std::async(some_task);
if(f.wait_for(std::chrono::milliseconds(35))==std::future_status::ready)
  do_something_with(f.get());
等待函数会返回一个状态值,表示是等待是超时,还是继续等待。这里可以等待期望值,所以当函数等待超时时,会返回std::future_status::timeout;当期望值状态改变,函数会返回std::future_status::ready;当与期望值相关的任务延迟了,函数会返回std::future_status::deferred。
3.3 时间点
时间点可以用std::chrono::time_point<>类型模板来表示,实例的第一个参数用来指定所要使用的时钟,第二个函数参数用来表示时间的计量单位(特化的std::chrono::duration<>),比如说std::chrono::time_point。
可以通过std::chrono::time_point<>实例来加/减时延,来获得一个新的时间点,所以std::chrono::hight_resolution_clock::now() + std::chrono::nanoseconds(500)将得到500纳秒后的时间。
auto start=std::chrono::high_resolution_clock::now()+std::chrono::nanoseconds(500);
我们可以通过做减法来计算时间:
auto start=std::chrono::high_resolution_clock::now();
do_something();
auto stop=std::chrono::high_resolution_clock::now();
std::cout<<”do_something() took “
  <<std::chrono::duration<double,std::chrono::seconds>(stop-start).count()
  <<” seconds”<<std::endl;
我们可以利用时间点做超时等待的工作,如果下面的代码换成wait_for()以时延为基础做判断的话,可能引发重复等待。
std::condition_variable cv;
bool done;
std::mutex m;

bool wait_loop()
{
  auto const timeout= std::chrono::steady_clock::now()+
      std::chrono::milliseconds(500);
  std::unique_lock<std::mutex> lk(m);
  while(!done)
  {
    if(cv.wait_until(lk,timeout)==std::cv_status::timeout)
      break;
  }
  return done;
}
4. 使用同步操作简化代码
4.1 期望的函数化编程
所谓的函数式编程(functional programming)是一种编程方式,这种方式中函数结果只依赖于传入函数的参数,并不依赖外部状态,就像f(x)=cosx+exf(x)=cosx+ex一样,输出的结果仅仅取决于输入的参数。我们以快排为例介绍如何使用函数式并发:
(1)快速排序FP模式版
下面的代码与std::sort()不同,std::sort()是无返回值的,因为参数接收的是迭代器,所以其可以对原始列表直进行修改与排序。
template<typename T>
std::list<T> sequential_quiksort(std::list<T> input)
{
    if (input.empty()) return input;
    std::list<T> res;
    res.splice(res.begin(), input, input.begin());
    const T& pivot = *res.begin();
    auto divided_point = std::partition(input.begin(),
        input.end(), [pivot = pivot](auto& t) {return t < pivot; });
    std::list<T> lower_part;
    lower_part.splice(lower_part.begin(), input, input.begin(),
        divided_point);
    auto new_lower(sequential_quiksort(std::move(lower_part)));
    auto new_higher(sequential_quiksort(std::move(input)));
    res.splice(res.begin(), new_lower);
    res.splice(res.end(), new_higher);
    return res;
}
主要介绍一下里面用到的STL库函数:
std::splice移动拼接
std::partition分离(predicate 谓语,这里指lambda表达式)
(2)快速排序FP并发版
template<typename T>
std::list<T> parallel_quick_sort(std::list<T> input)
{
if(input.empty())
{
return input;
}
std::list<T> result;
result.splice(result.begin(),input,input.begin());
T const& pivot=*result.begin();
auto divide_point=std::partition(input.begin(),input.end(),
[&](T const& t){return t<pivot;});
std::list<T> lower_part;
lower_part.splice(lower_part.end(),input,input.begin(),
divide_point);
std::future<std::list<T> > new_lower( // 1
std::async(¶llel_quick_sort<T>,std::move(lower_part)));
auto new_higher(
parallel_quick_sort(std::move(input))); // 2
result.splice(result.end(),new_higher); // 3
result.splice(result.begin(),new_lower.get()); // 4
return result;
}
当前线程不对小于“中间”值部分的列表进行排序,使用std::async()①在另一线程对其进行排序。大于部分列表,如同之前一样,使用递归的方式进行排序②。如果开启线程过多,运行库会自动裁剪线程。
因避开了共享可变数据,函数化编程可算作是并发编程的范型,并且也是通讯顺序进程(CSP,Communicating Sequential Processer)的范型。
4.2 持续性并发
这里主要介绍std::experimental::future的特性:持续性。
与std::future类似 , std::experimental::future存储值也只能检索一次。如果期望值正处于持续使用状态,那这个期望值就不能被其他代码所访问。因此,使用fut.then()为fut期望值添加持续性后,对原始期望值fut的操作就是非法的。另外,调用fut.then()会返回一个新期望值,这个新期望值会持有持续性调用的结果。
std::experimental::future<int> find_the_answer;
auto fut=find_the_answer();
auto fut2=fut.then(find_the_question);
assert(!fut.valid());
assert(fut2.valid());
与直接调用std::async或std::thread不同,持续性函数不需要传入参数,因为运行库已经为其定义好了参数——会传入一个就绪态持续性期望值,这个期望值保存了持续性触发后的结果。假设find_the_answer返回类型为int,find_the_question函数根据之前的例子将会传入一个std::experimental::future作为唯一参数:
std::string find_the_question(std::experimental::future<int> the_answer);
下面举一个利用持续性的例子:
假如用户要登录你的应用,输入账号密码后,将账号送达后台获取ID,然后根据ID检查密码,通过后将信息显示出来。如果我们采用串行执行:
void process_login(std::string const& username, std::string const& password)
{
  try{
    user_id const id = backend.authenticate_user(username, password);
    user_data const info_to_display = backend.request_current_info(id);
    update_display(info_to_display);
  } catch(std::exception& e){
    display_error(e);
  }
}
串行可能会阻塞UI线程,如果我们采用async的方式将他们放到其他线程上,依旧会阻塞UI:
std::future<void> process_login(
  std::string const& username, std::string const& password)
{
  return std::async(std::launch::async,[=](){
    try{
      user_id consst id = backend.authenticate_user(username, password);
      user_data const info_to_display =
        backend.request_current_info(id);
      update_display(info_to_display);
    } catch(std::exception& e){
      display_error(e);
    }
  });
}
为了避免阻塞相应线程,需要有机制对每个完成的任务进行连接:持续性。
std::experimental::future<void> process_login(
  std::string const& username, std::string const& password)
{
  return backend.async_authenticate_user(username, password).then(
    [](std::experimental::future<user_id> id){
      return backend.async_request_current_info(id.get());
    }).then([](std::experimental::future<user_data> info_to_display){
      try{
        update_display(info_to_display.get());
      } catch(std::exception& e){
        display_error(e);
      }
    });
}