着重介绍基于锁的结构设计,包括queue,map和list。同时稍微讲了一些原子操作的内容。由于原子操作内容过于复杂,我就只涉及了一些皮毛。
设计并发数据结构意味着,多个线程可以并发的访问这个数据结构,线程可对这个数据结构做相同或不同的操作,并且每一个线程都能在自己域中看到该数据结构。多线程环境下,无数据丢失和损毁,所有的数据需要维持原样,且无条件竞争,这样的数据结构称之为线程安全。
在第二篇中,我们介绍了互斥量,但是本质上:在互斥量的保护下,同一时间内只有一个线程可以获取互斥锁。互斥量为了保护数据,显式的阻止了线程对数据结构的并发访问。这中行为称之为串行化(serialization):线程轮流访问被保护的数据。这是对数据进行串行的访问,而非并发。当然我们可以减少保护区域,减少序列化操作,就能提升并发访问的能力。
1. 基于锁的并发数据结构设计
前面在第二篇介绍了基于锁的线程安全栈和第三篇基于锁和条件变量的线程安全队列,接下来我们再看一些精妙的设计实例。
1.1 基于细粒度锁和条件变量的线程安全队列
(1)单线程版本
我们首先来实现一个单线程版本的队列:
template<typename T>
class queue
{
private:
    struct node
    {
        T data;
        std::unique_ptr<node> next;
        node(T data_):data(std::move(data_)) {}
    };
    std::unique_ptr<node> head;
    node* tail;

public:
    queue() {}
    queue(const queue& other) = delete;
    queue& operator=(const queue& other) = delete;

    std::shared_ptr<T> try_pop()
    {
        if (!head)
            return std::shared_ptr<T>();
        std::shared_ptr<T> res{ make_shared<T>(move(head->data)) };
        const std::unique_ptr<node> old_head = move(head);
        head = move(old_head->next);
        return res;
    }
    void push(T new_value)
    {
        std::unique_ptr<node> p(new node(std::move(new_value)) );//**
        if (!tail)
            head = std::move(p);
        else
            tail->next = move(p);
        tail = p.get();
    }
};
注意几个点:
- 使用了
std::unique_ptr来管理节点,因为其能保证节点(其引用数据的值)在删除时候,不需要使用delete操作显式删除。 - 使用
std::shared_ptr来返回被弹出值,这样可以保证结果能够被多次调用 - 要注意考虑
head为空的时候的push情况 - 注意星号处创建node指针的办法
p.get()能提取被unique_ptr包裹的指针,这样他就是一个正常的指针了。
(2)通过分离数据实现并发
单线程版本移植到并发版本时有一个很大的问题,push和pop既访问head又访问tail,当我们的队列只有一个元素时head==tail,如果对两个对象上锁就是上的同一把锁。这是我们就需要请出在leetcode刷题中非常非常常见的虚拟节点了。
template<typename T>
class queue
{
private:
    struct node //1
    {
        shared_ptr<T> data;
        unique_ptr<node> next;
    };
    unique_ptr<node> head;
    node* tail;
public:
    queue() :head(new node), tail(head.get()) {} //2
    queue(const queue& other) = delete;
    queue& operator=(const queue& other) = delete;

    shared_ptr<T> try_pop()
    {
        if (head.get() == tail) //3
            return shared_ptr<T>();
        const shared_ptr<T> res(head->data);
        unique_ptr<node> old_head(move(head));
        head = move(old_head->next);
        return res;
    }
    void push(T value) //4
    {
        shared_ptr<T> packed_data(make_shared<T>(move(value)));
        unique_ptr<node> tmp_node(new node);
        node* new_tail = tmp_node.get();

        tail->data = packed_data;
        tail->next = move(tmp_node);
        tail = new_tail;
    }
};
先来谈谈它和(1)有什么区别:
- 结构不一样了,对暴露的data进行了进一步封装,取消了构造函数,因为我们不需要初始化一个节点了。
- 默认构造函数不一样了,默认创建一个head和tail,第一个默认构造没有初始化任何东西,所以我们在push和pop时要判断是否为空,现在修改结构以后我们不判断了,所以必须要在这里初始化。
- 承接上条,由于我们现在默认构造时都会为head和tail赋予意义,所以需要以这样的方式判断。
- push的方法很不同,data的结构变了,不再是T,所以要先包装data,把它送到tail指向的地方。然后让tail往后移动一个位置,同时新node指向新tail。
由于分离了head和tail现在它变成了线程安全的队列,并且现在的push()只能访问tail,而不能访问head。现在的问题是我们在哪里加锁,而且我们需要上锁的事件尽可能的少。
对push的上锁是简单的,如前面所说现在只能访问tail把他用到的地方锁上即可。而try_pop就很麻烦了。
template<typename T>
class threadsafe_queue
{
private:
    struct node
    {
        std::shared_ptr<T> data;
        std::unique_ptr<node> next;
    };
    std::mutex head_mutex;
    std::unique_ptr<node> head;
    std::mutex tail_mutex;
    node* tail;

    node* get_tail()
    {
        std::lock_guard<std::mutex> tail_lock(tail_mutex);
        return tail;
    }

    std::unique_ptr<node> pop_head()
    {
        std::lock_guard<std::mutex> head_lock(head_mutex);
        if (head.get() == get_tail())
        {
            return nullptr;
        }
        std::unique_ptr<node> old_head = std::move(head);
        head = std::move(old_head->next);
        return old_head;
    }
public:
    threadsafe_queue() :
        head(new node), tail(head.get())
    {}
    threadsafe_queue(const threadsafe_queue& other) = delete;
    threadsafe_queue& operator=(const threadsafe_queue& other) = delete;

    std::shared_ptr<T> try_pop()
    {
        std::unique_ptr<node> old_head = pop_head();
        return old_head ? old_head->data : std::shared_ptr<T>();
    }

    void push(T new_value)
    {
        std::shared_ptr<T> new_data(
            std::make_shared<T>(std::move(new_value)));
        std::unique_ptr<node> p(new node);
        node* const new_tail = p.get();
        std::lock_guard<std::mutex> tail_lock(tail_mutex);
        tail->data = new_data;
        tail->next = std::move(p);
        tail = new_tail;
    }
};
由于guard_lock的局限性,所以我们不得不将try_pop封装成几个函数来实现细粒度锁。需要用到哪个锁,就把这段代码封装为函数。比如,最开始需要比较head和tail就把tail封装起来,相较于直接将两个同时锁住,tail受影响的时间就会小得多。
下面这段代码是个反例,这显然不是线程安全的。
std::unique_ptr<node> pop_head() // 这是个有缺陷的实现
{
  node* const old_tail=get_tail();  // 1 在head_mutex范围外获取旧尾节点的值
  std::lock_guard<std::mutex> head_lock(head_mutex);

  if(head.get()==old_tail)  // 2
  {
    return nullptr;
  }
  std::unique_ptr<node> old_head=std::move(head);
  head=std::move(old_head->next);  // 3
  return old_head;
}
1.2 基于锁的线程安全查询表
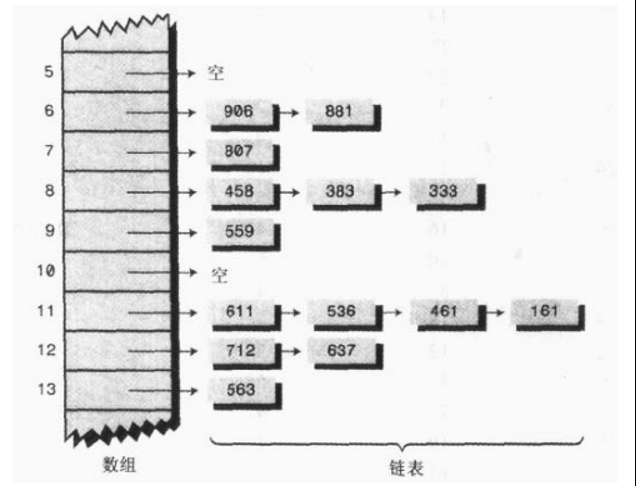
本例的目的是构建一个线程安全的哈希表,这里哈希表是通过”桶”实现的,或者也叫链地址法。

图中所示的链表就可以具象的理解为一个一个的桶,这些桶合在一起构成了一个桶组。因此我们设计这个哈希表应该围绕桶组构成。想要顺利使用桶,我们需要定义桶,定义桶组,定义搜索桶位置的函数。
他的源码有点错误,2那个位置函数签名中的const应该去除。
template<typename Key, typename Value,typename Hash=hash<Key>>
class threadsafe_lookup_table
{
private:
    class bucket_type
    {
    private:
        typedef std::pair<Key, Value> bucket_value;
        typedef std::list<bucket_value> bucket_data;
        using bucket_iterator = typename bucket_data::iterator;
        bucket_data thisbucket;
        mutable std::shared_mutex mutex;
        bucket_iterator a;
        bucket_iterator find_entry_for(Key const& key)  // 2
        {
            auto m =  std::find_if(thisbucket.begin(), thisbucket.end(),
                [&](bucket_value const& item)
                {return item.first == key; });
            bucket_iterator b;
            return m;
        }

    public:
        Value value_for(Key const& key, Value const& default_value)
        {
            std::shared_lock<std::shared_mutex> lock(mutex);
            auto found_entry = find_entry_for(key);
            return (found_entry == thisbucket.end()) ?
                default_value : found_entry->second;
        }
        void add_or_update_mapping(Key const& key, Value const& value)
        {
            std::unique_lock<std::shared_mutex> lock(mutex);
            auto found_entry = find_entry_for(key);
            if (found_entry == thisbucket.end())
                thisbucket.push_back(bucket_value(key, value));
            else
                 found_entry->second = value;
        }
        void remove_mapping(Key const& key)
        {
            std::unique_lock<std::shared_mutex> lock(mutex);
            auto found_entry = find_entry_for(key);
            if (found_entry != thisbucket.end())
                thisbucket.erase(found_entry);
        }
    };

    vector<unique_ptr<bucket_type>> buckets;
    Hash hasher;
    bucket_type& get_bucket_entry(Key const& key)const
    {
        auto bucket_index = hasher(key) % buckets.size();
        return *buckets[bucket_index];
    }

public:
    typedef Key key_type;
    typedef Value mapped_type;

    typedef Hash hash_type;
    threadsafe_lookup_table(
        unsigned num_buckets = 19, Hash const& hasher_ = Hash()) :
        buckets(num_buckets), hasher(hasher_)
    {
        for (unsigned i = 0; i < num_buckets; ++i)
        {
            buckets[i].reset(new bucket_type);
        }
    }
    threadsafe_lookup_table(threadsafe_lookup_table const& other) = delete;
    threadsafe_lookup_table& operator=(threadsafe_lookup_table const& other)=delete;

    Value value_for(Key const& key, Value const& default_value = Value())const
    {
        return get_bucket_entry(key).value_for(key, default_value);
    }
    void add_or_update_mapping(Key const& key, Value const& value)
    {
        get_bucket_entry(key).add_or_update_mapping(key, value);
    }
    void remove_mapping(Key const& key)
    {
        get_bucket_entry(key).remove_mapping(key);
    }
};
1.3 支持迭代器的线程安全链表
代码易懂,有几点很值得学习:
node成员的创建方式,分为可共享和不可共享- 新节点的
new创建方式 new_node是指针指向地址,所以需要用箭头,而head是一个实例,可以用点操作符。- 函数模板
template<typename T>
class threadsafe_list
{
private:
    struct node
    {
        std::mutex m;
        std::shared_ptr<T> data;//1
        std::unique_ptr<node> next;
        node() :next() {}
        node(T const& value) :data(make_shared<T>(value)) {}
    };
    node head;
public:
    threadsafe_list() {}
    threadsafe_list(threadsafe_list const& other) = delete;
    threadsafe_list& operator=(threadsafe_list const& other) = delete;

    void push_front(T const& value)
    {
        std::unique_ptr<node> new_node(new node(value));//2
        std::lock_guard<mutex> lk(head.m);
        // head为虚拟节点,无具体值
        new_node->next = move(head.next);//3
        head.next = move(new_node);
    }

    template<typename Function>//4
    void for_each(Function f)
    {
        auto current = &head;
        std::unique_lock<mutex> lk(head.m);
        while (current->next.get() != nullptr)
        {
            auto next = current->next.get();
            std::unique_lock<mutex> next_lk(next->m);
            lk.unlock();
            f(*next->data);//5
            current = next;
            lk = move(next_lk);//6
        }
    }

    template<typename Function>
    shared_ptr<T> find_first_if(Function f)
    {
        auto current = &head;
        unique_lock<mutex> lk(head.m);
        while (current->next.get() != nullptr)
        {
            unique_lock<mutex> next_lk(next->m);
            lk.unlock();
            if (fun(*next->data))
                return next->data;
            current = next;
            lk = std::move(next_lk);
        }
    }
    template<typename Function>
    void remove_if(Function f)
    {
        node* current = &head;
        std::unique_lock<std::mutex> lk(head.m);
        while (node* const next = current->next.get())
        {
            std::unique_lock<std::mutex> next_lk(next->m);
            if (f(*next->data))
            {
                std::unique_ptr<node> old_next = std::move(current->next);
                current->next = std::move(next->next);
                next_lk.unlock();
            }
            else
            {
                lk.unlock();
                current = next;
                lk = std::move(next_lk);
            }
        }
    }
};
重点讲讲56。
首先来说6,指针和引用是个老大难的问题,这里做一下梳理:
std::unique_ptr<node> new_node(new node(5)); //被unique_ptr封装好的具有GC机制的指针
auto m =new_node.get(); //能用的普通指针,指向node的地址
auto x = *m->data; //*m 解引用,指向node,x=5
auto y = new_node->data; //由于data被std::shared_ptr<T>封装,相当于做了一个指针拷贝
auto z = y.get(); //从shared_ptr<T>抽取的data指针,解引用*z后等于5
再来说说6,这个操作很精妙。整个操作中需要用到的是当前节点current和下一个节点next,采用滑动锁的形式,以lk为基准,向后滑动,同时创建lk_next锁住next
2. 无锁数据结构设计
2.1 前言—原子操作
原子操作指的是不可分割的操作,这种操作要么做了要么没做,不可能观察到做一半的这种状态。原子操作的关键就是使用一种同步操作方式,来替换使用互斥量的同步方式。
(1)std::atomic
最基本的原子整型类型就是std::atomic。可以使用非原子的bool类型进行构造,所以可以被初始化为true或false。
下面这段代码完成:
- 创建原子变量b
- 创建一个普通bool变量x,加载进入原子变量b
- b中的值存储为true
- 读取原子变量存储的值,修改为false,再存入(读-改-写)
std::atomic<bool> b;
bool x=b.load(std::memory_order_acquire);
b.store(true);
x=b.exchange(false, std::memory_order_acq_rel);
读改写操作是原子变量中非常常见且重要的操作,除了exchange()外还有比较\交换操作,对应的函数时compare_exchange_weak()和compare_exchange_strong()成员函数。它比较原子变量的当前值和一个期望值,当两值相等时,存储所提供的值;当两值不等,期望值就会被更新为原子变量中的值。
compare_exchange_weak()可以伪失败(由于某些计算机本身的特性,导致当前线程不能很好完成这个操作,需要调用其他线程来替代工作,造成这种情况主要是时间不够而不是变量本身的问题),所以我们需要用一个循环来保证。b.compare_exchange_weak(expected,true)返回true时就是成功的时候。
bool expected=false;
extern atomic<bool> b; // 设置些什么
while(!b.compare_exchange_weak(expected,true) && !expected);
(2)std::atomic指针运算
和atomic一样,std::atomic也有load(), store(), exchange(), compare_exchange_weak()和compare_exchage_strong()成员函数,与std::atomic的语义相同,获取与返回的类型都是`T*,而不是bool`。
std::atomic为指针运算提供新的操作。基本操作有fetch_add()和fetch_sub()提供,它们在存储地址上做原子加法和减法,为+=, -=, ++和—提供简易的封装。
vector<int> a{ 1, 2, 3, 4, 5 };
std::atomic<int*> p(&a[0]); //p以int指针形式,指向1
auto m = p.fetch_add(2); //p右移两个单位,指向3,返回它的原始值(指向1的时)
auto n = (p -= 1); //p左移一个单位,指向2,返回原始值(指向3时)
2.2 无锁的线程安全栈
栈是先进后出,我们需要一个head一个tail,放的时候放入head,那么head就是我们需要保护的对象了。
template<typename T>
class lock_free_stack
{
private:
    struct node
    {
        T data;
        node* next;
        node(T const& data) :data(data_) {}
    };
    std::atomic<node*> head;
public:
    void push(T const& data)
    {
        node* const new_node = new node(data);
        new_node->next = head.load();
        while (!head.compare_exchange_weak(new_node->next, new_node));
    }
};
head是一个原子变量的node*指针,指向栈的头部。push的时候将head指针装载到新节点的next,然后再用新节点去替代head,他自己就成了head。和之前一样需要用循环的办法避免伪失败。
下面我们来完成pop的操作。我们需要确保当head为空时,程序不会报错,所以要先检查一下。注意,结构是无锁的,但并不是无等待的,因为在push()和pop()函数中都有while循环,当compare_exchange_weak()总是失败的时候,循环将会持续下去。
template<typename T>
class lock_free_stack
{
private:
    struct node
    {
        T data;
        node* next;
        node(T const& data) :data(std::make_shared<T>(data_)) {}
    };
    std::atomic<node*> head;
public:
    void push(T const& data)
    {
        node* const new_node = new node(data);
        new_node->next = head.load();
        while (!head.compare_exchange_weak(new_node->next, new_node));
    }
    std::shared_ptr<T> pop()
    {
        node* old_head = head.load();
        while (old_head && !head.compare_exchange_weak
        (old_head, old_head->next));
        return old_head ? old_head->data : shared_ptr<T>();
    }
};